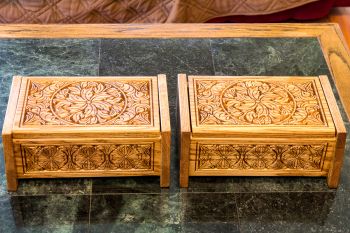
Sewing Boxes
I enjoy making new things from wood. Taking a natural material and brining out the beauty of the wood through design and finish is an art. There is a spirit in wood itself that is contained in natural once living material. I think all hand made art and crafts contain a bit of the artist’s spirit, but wood just has that something extra.
The design of a wood item is of course the first impression. There are many ways wood can be used to produce a product. Shaping, cutting, joining are a few. Many more methods go far beyond these simple steps. It is because of its many ways of being worked with common tools and methods that people like me continue to enjoy working with wood.
There is one important part of making a wood item that may not be realized by the non wood worker. It is the finishing process. To a real wood worker, slapping on a coat of paint is not a suitable finish for fine woodworking.
This cringing short-cut finish practice is seen on a lot of “bad science” home rebuilding TV shows. There are a few shows that have a separate professional wood worker who does finish work correctly, but the build-it-in-the-tent and spray-paint folks are a crime against serious woodworking and remodeling.
Properly finishing a fine wood creation is as difficult as making the piece in the first place. Actually it is a totally separate skill set than construction. I often spend more days in finish work than in the making. Not necessarily more working hours, as the time is burned waiting for a finish process step to dry or cure before the next step.
I just finished these two stained oak sewing boxes. The design is called a “Paradise Box” on the Vectric Forum. Here is the finishing process I used. Times two, since I made two boxes The boxes were first completely built, all wood working complete.:
- Multiple grade complete sanding inside and out, all surfaces.
- a.course
- b. medium
- c. fine
- Vacuum wipe down all sanding dust.
- One brush coat of Pre-Stain all surfaces (All products are oil based Minwax.)
- Clean brush
- Two hour max set time
- Brush and wipe oil based stain (Natural Oak) all surfaces
- Overnight cure (8 to 16 hours) High Texas humidity slowed curing a bit.
- Stir can of low gloss Polyurethane varnish. (All the good stuff is on the bottom of the can)
- Brush coat on bottom surfaces of lid and box.
- Clean brush
- Cure about 8 hours (no tack) so item can be flipped first coat side down. I use little spacers to elevate.
- Open & stir poly again. (To not induce air bubbles.)
- Brush coal all remaining surfaces.
- Clean brush.
- Allow curing overnight (8 – 16 hours)
- Medium steel wool all surfaces until smooth and dull.
- Vacuum and wipe all surfaces to be clean of steel wool and varnish dust.
- Repeat steps 8 through 17. Requires same amount of time.
- Apply a wipe (thin) coat of poly following steps 8 through 15 this time.
Some finishers will use a final super fine steel wool then wax the finish. I stop here and let the finish really age for awhile without the wax. If it is not a super finish show piece, I don’t think it needs further work.
I removed the hinge for the finish work so the box needs to be re-assemble after the finish has cured to a suitable hardness.
I don’t have the room to do both at once so I had to follow this procedure twice. The results are worth it.
Update 9/9/16
Just added two trays to each box. Each are pocket routed out of a single solid 3/4" board. If two trays are used in the box then they can not be filled over the top edge of the tray. I figured one tray was enough but now the owner will have the option of two or just leave one out.


